Showing posts with label choice. Show all posts

Monday, July 10, 2017

Animal Textile Mixed Media Compositions


Animal Textile Mixed Media Composition - I really need to find a more succinct name for this awesome project. Students study Islamic art and design principles, connect their learning to a habitat, and then put it all together with an array of materials. Students love all of the choice in this project and the results are stunning.

 
Accessed at www.patterninislamicart.com
As a starting point, students learn the different motifs that make up traditional Islamic design. These are easy to distinguish but it's important vocabulary for students to develop so they are accurately able to describe what they see. We also discuss some of the religious implications that set Islamic designs apart from other artistic traditions - namely, that humans and animals are very rare except in stylized forms. 

Depending on the amount of time we have for this unit, I like to discuss how ideas migrate to influence artists and their products. This is a great time to make a connection between art and world history by examining the Silk Road. Here is a video from Crash Course World History, hosted by the John Green of Paper Towns fame, that gives students a brief intro to this complex system of trade and the spread of ideas.


Then students "migrate" a piece of A4 paper around their table after first folding it into quarters and creating a design of their choosing in the first box. The second student who gets the paper will take design ideas they like from the first design but reimagine it a bit in the next box on the paper. This continues until all of the boxes have a design in them. If students finish their designs before it's time to pass then they can add color and more detail. 

But let's get back to the main project of this unit - the mixed media compositions. These are the steps students go through to create their final artwork:
  1. Choose a traditional Islamic design for your background. Which motif does it show? Calligraphy, geometric, or arabesque?
  2. Sketch your design on an A3 background paper in pencil. Your design may be simplified to allow better color application later.
  3. Add color to your background with acrylic paint. Are all of your pencil lines covered up?
  4. Research and select an animal from the desert habitat to feature as your subject.
  5. Practice and then sketch your animal using either charcoal, ink, or colored pencils.* Did you add details that give the animal form and texture?
  6. Cut out and attach your animal to the background. Take care if you used charcoal that your sketch didn't smudge.
Here are two student examples.


Are your students struggling with realism in their drawing? Students usually work from reference photos and I show them the video "Austin's Butterfly" as a reminder to use careful observation when developing realism. Students also benefit from the act of critique during this project to practice looking carefully at others' work and reflecting on their own drawings.

Saturday, September 24, 2016

Project: What's On Your Mind? for 5th Grade

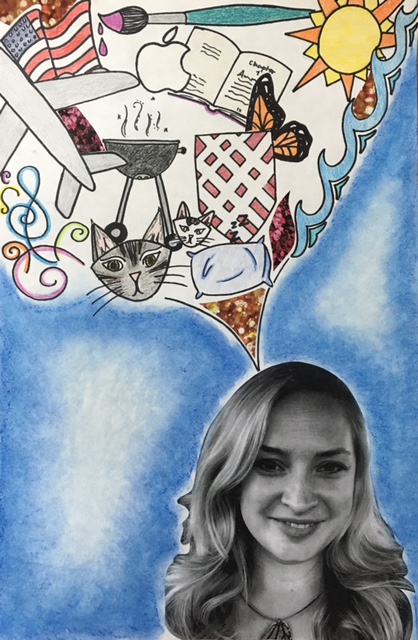
My example of 5th grade's What's On Your Mind? project.
It was a great alignment of schedules, testing requirements, and a religious holiday that sent my school on a week-long holiday barely two and a half weeks after we returned from summer vacation. Believe me, though, we appreciated that break when it came. I was a little worried that the rituals and routines we had established at the beginning of the year would be forgotten but so far so good in coming back strong!

Before break, students started a project in our Getting To Know You unit. These projects ask students to creatively communicate information about themselves as the first subject of the year. Following the theme of this unit, 5th graders worked on the What's On Your Mind? project. A 12x18" white drawing paper serves as the background for a photograph of the student with a thought bubble filled by small sketches of objects and ideas that are important to them.

Students began this project by completing a questionnaire exploring their interests, preferences, and personal experiences. You can grab the questionnaire we used in the step-by-step directions below. Once students had their wheels turning with details about themselves it was time to make it artistic. We discussed symbols, where we see them in the world around us, and students came up with their own definition for "symbol" as a picture that represents a bigger idea without using words. A good example of this from my project that I shared above is the sun and waves I used to represent that I used to live on the coast in Florida before I moved abroad. I simplified my idea down to something easier to draw than a whole beach scene. Put together, these symbols create a very graphic effect that highlights students' drawing skills. 

So what about the kids who hate drawing? Don't worry, we've got them covered too. Offer students old magazines, scissors, and glue. They can collage together clippings that still represent their interests, preferences, and personal experiences without the stress of creating them by hand. In my own work, I am in the process of filling some of the spaces between my symbols with magazine clippings of interesting colors and textures. I also let students trace some symbols such as sports logos, technology icons like the Apple symbol, and flags. Remember, this is the beginning of the year and I'd rather ease them into art-making than start off on the wrong foot with reluctant artists. Finally, students added color with fine-tip markers and colored pencils. The blended effect in the background was done with chalk pastel. Have students tape their brainstorming questionnaire on the back for a great artifact to put in their portfolios and a baseline for some basic drawing and fine motor skills.

Step-by-step directions:
  1. Students fill out a questionnaire about their interests, preferences, and personal experiences.
  2. While students are working on the questionnaire, go around and take a close-up picture of each student. Before the next session, print these pics in black and white to save your school's ink cartridges.
  3. Students cut out their pictures around the shoulders and head (careful not to cut off their hair, since a surprising number of mine almost made this mistake!). Glue the picture along the bottom edge of a 12x18" white drawing paper.
  4. Students may use computers/devices with Internet access to find images for tracing or reference for their sketches.
  5. Sketch or collage magazine clippings in the thought bubble above the student's picture.
  6. Add color with fine-tip markers and/or colored pencils as these are easy to control while working on small details.
  7. Use chalk pastels to add color to the background. I recommend giving a mini-lesson on the pastels before letting students loose with them. Many students need reminders to press gently, apply a few swipes of color and then blend with a tissue to avoid massive colored dust bunnies gathering on their paper. And the table. And their neighbor's artwork. Some artists also dip their chalk pastels in water before applying color, which is effective at reducing dust, though it has shortened the life of pastels in my experience.
My classroom is by not necessarily choice-based or TAB. However, I encourage students to exercise their creative muscles in projects to explore their ideas and the materials. Do students need to sketch a symbol for every answer on their questionnaire? No, but it's a good place for inspiration if they get stuck. Can they add symbols of items not covered on the questionnaire? Sure! Does every student need to add a blue blended background? Definitely not! At the beginning of the year I tell my students they aren't allowed to ask me "Can I...?" questions. When they ask if they are "allowed" to do something I usually respond with, "That sounds like a creativity question." I am their art teacher and I feel that it's my job to facilitate creative experiences, not be the warden of ideas. Do I come up with interesting, visually effective projects? I think so. Do I have the best ideas? Not for each child. I want them to feel confident in their creativity and proud of their artistic expressions. The only time I rain on their idea parade is if it might hurt/waste the art materials (like mixing all the paint colors together).

What projects do you introduce at the beginning of the year? How do you get to know your students? In what ways do you encourage creativity in your students?

Artfully,
Catherine